Groucho Marx

"Outside of a dog, a book is man's best friend. Inside of a dog, it's too dark to read."
~Groucho Marx~


Saturday, November 10, 2012

Chocolate Peanut Butter Pretzel Cookies

I love peanut butter. I mean, I REALLY love peanut butter. It is without a doubt my favorite food. Any time I see something made with peanut butter, I have to try it. And even as a full grown adult, I still love peanut butter and jelly sandwiches.

In order to be a true peanut butter connoisseur, you need to know your peanut butter. Without a doubt, my favorite peanut butter comes from Peanut Butter & Co. I found Peanut Butter & Co. years ago on a trip to NYC when I convinced my parents to have lunch there. It was amazing! A visit to this restaurant should be on the bucket list of all PB fans. Then, a couple of years later I walked into a Wegmans grocery store and saw their brand of PB on the shelves.

Now that I can get it in Pennsylvania, this is the only peanut butter I buy. And since it is recommended by the fine folks over at Eat This, Not That, I feel even better about enjoying it.

Now, the geniuses at Peanut Butter & Co. don't just make creamy and crunchy PB, they've extended their line to include such gems as White Chocolate Wonderful (PB mixed with white chocolate), Cinnamon Raisin Swirl, Mighty Maple, and more. But this particular recipe uses the awesome Dark Chocolate Dreams...yup, peanut butter and dark chocolate mixed together.
I came up with the idea for chocolate peanut butter pretzel cookies after trying a biscotti at a fair made with those ingredients. Technically, these cookies are double chocolate, double peanut butter pretzel cookies. The base is your basic peanut butter cookie, but I replaced the regular PB with Peanut Butter & Co.'s Dark Chocolate Dreams.
After creaming the butter, peanut butter, sugar and adding the eggs, flour, vanilla and baking soda, I added the chocolate and peanut butter chips, I used a full bag of each. When it came to the pretzels,I thought long and hard about what size and shape. I decided to use thin pretzel sticks and broke them into small pieces, I used a little more than a cup.
I took a generous tablespoon of dough, rolled it into a ball, and flattened them slightly on the cookie sheet.
I baked them for 12 minutes.

They came out a little crispy and full of amazing flavor! Sweet, salty, and peanut buttery.


Recipe: 

2 1/2 cups flour
1 tsp baking soda
2 sticks unsalted butter, softened
1 cup brown sugar
1 cup granulated sugar
1 1/2 cups Peanut Butter & Co. Dark Chocolate Dreams
2 eggs
1 tsp vanilla
1 bag semi-sweet chocolate chips
1 bag peanut butter chips
1 heaping cup thin pretzel sticks, broken into small pieces

 Preheat oven to 350 degrees

Sift together flour and baking soda, set aside

With stand mixer (or hand held mixer) cream butter, sugars, and peanut butter together.

 Add eggs and vanilla, mix.

 Add flour mixture and combine.

 Add chips and pretzels and mix until just combined.

 Take a generous tablespoon sized ball of dough, set on parchment paper lined cookie sheet and flatten slightly.

 Bake for 12 minutes or until bottom is slightly browned.

 Enjoy!

Sunday, February 19, 2012

Girl Scout Cookie Truffles


It's that time of year again! Girl Scout Cookie time! I was a Girl Scout for 7 years and sold many, many boxes to kind neighbors and patient strangers. As an adult, I used to never buy them because they're too much of a temptation to have in the house (Curse you Tagalongs!). But then a young friend joined Girl Scouts and I had to support her.

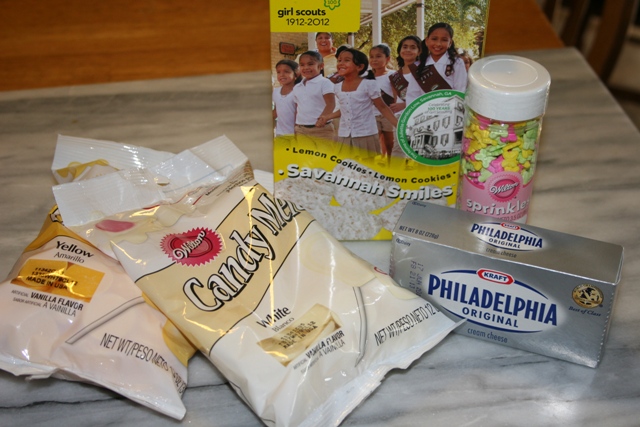
I decided to order a couple of boxes of the new Savannah Smiles Cookies and Thin Mints so I could come up with a way to use them.


I know making "truffles" out of cookies is nothing new. I made the famous Oreo truffles a couple of years ago; super easy, very rich, and really good. I used the Savannah Smiles to make that kind of truffle, which I consider "Cheater Truffles" because, let's be honest here, grinding up cookies and mixing them with cream cheese isn't a real truffle.

Let's start with the Savannah Smiles Truffles.


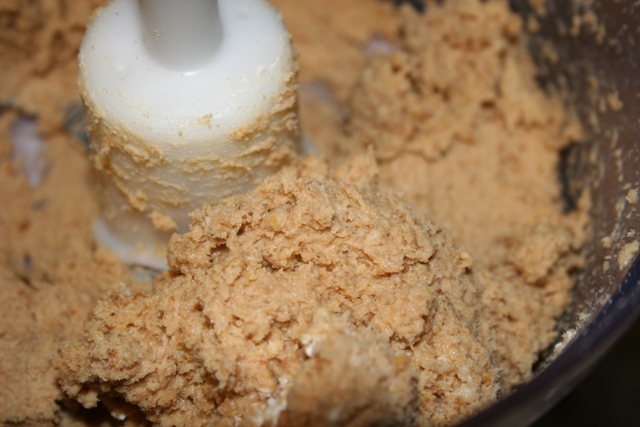
I took 2 boxes of the new lemon cookies and ran them through the food processor until they were chopped up into small pieces (you could also put the cookies in a freezer bag and crush them with a rolling pin). I then added an 8oz block of cream cheese and pulsed the food processor to combine.


After lining a cookie sheet with parchment paper, I took a heaping tablespoon and rolled the cookies and cream cheese into small balls. I covered the cookie sheet with plastic wrap and stuck it in the freezer for an hour.


Now, let me just start by saying that I hate dipping things into chocolate (truffles, cake balls, etc). It never works out too well for me and I have no patience for it. The only way I actually enjoy doing it is if I use a lollipop stick and turn them into cake pops or truffle pops. Next time I make these, I'm going to do that.

I melted white candy melts and coated the truffles and allowed them to set. Then I melted yellow candy melts and drizzled it over the top and finished them off with a yellow candy butterfly, just because.

With the Thin Mints I made real truffles using Alton Brown's Chocolate Truffle recipe as the base and tweaking it a little.


His recipe calls for 10oz of bittersweet chocolate. After grounding up the Thin Mints in the food processor...


I combined 5 oz of the Thin Mints and 5 oz of Special Dark chocolate chips.


Following Alton Brown's recipe, I added 3 tablespoons of unsalted butter and put it in the microwave for two 30 second intervals, stirring between.


I heated 1/2 cup of heavy whipping creaming and 1 tablespoon of light corn syrup to simmering and then poured it over the chocolate, letting it sit for two minutes. I mixed it until smooth and poured it into a ceramic dish, covering it with plastic wrap and putting it in the fridge for an hour.


I then used a 1/2 tablespoon to scoop out the ganache and set it on a parchment lined cookie sheet to set in the fridge for another hour.


In his recipe, Alton Brown lightly coats the truffles in chocolate before rolling it in cocoa. I started rolling my truffles in melted dark chocolate before rolling it in the leftover crushed up Thin Mints.


This just proved to be too messy and created lumpy truffles. The ganache itself was sticky enough for the Thin Mints to stick to them, so I stopped using the chocolate and just coated the truffles in the Thin Mints.

These truffles all ended up being super rich, but delicious! In the future, I think I'd make the Savannah Smiles truffles a little smaller, otherwise, I wouldn't change a thing.


I think the Savannah Smiles would make a great crust for lemon bars or lemon/blueberry bars.

Looks like I'm going to have to order more cookies.

Sunday, November 13, 2011

Hello Dolly Chocolate Bark


It's getting to be that time of year when I need to start planning and getting started on my Christmas baking. Every year I want to try my hand at something new and, for some reason, this year I have a small obsession with chocolate bark.

I blame Pinterest.

I recently joined and I've already pinned several things to my boards. One day, someone I follow posted a chocolate bark recipe, so I searched for more and, sometime later, I had decided I needed to create my own, a twist on one of my all-time favorite baked goods.

Growing up, my grandmother made Hello Dolly bars for Christmas every year. It was always a special thing she made when we would come and visit because it was my favorite.

Now, some of you know exactly what I'm talking about. But others are trying to figure out what a Hello Dolly bar is. Some people call it a seven layer bar. It has a graham cracker crust, then you sprinkle chocolate chips, walnuts, and sweetened coconut on top. Over all that you pour sweetened condensed milk and bake it.

So sweet, so good!

Some people use pecans instead of walnuts, others add butterscotch chips. But this is the recipe our family always used.

I have already created a Hello Dolly cupcake, it's a yellow graham cracker cake with walnuts and chocolate chips and a toasted coconut buttercream icing. So far, that is still my favorite recipe that I've created.

But how to turn this bar cookie into a candy?


It took only 5 ingredients:
White Chocolate Chips
Dark Chocolate Chips (you could use semi-sweet or even milk chocolate, but I wanted to cut into the sweetness of the white chocolate and other ingredients)
Graham Crack Crumbs
Chopped Walnuts
Toasted Coconut

First thing I did was take 1/2 cup of sweetened coconut flakes and spread it out on a cookie sheet. Toasting coconut is super easy. Put the cookie sheet into a preheated 350 degree oven and check every few minutes, stirring it with a wooden spoon. The stirring is very important for even toasting.


While the coconut is in the oven. Melt the white chocolate chips.


I put them in the microwave, stopping it every 20-30 seconds and stirring. White chocolate melts faster than chocolate, so keep an eye on it!

When it's melted and smooth, spread the white chocolate on a parchment sheet or Silpat lined cookie sheet.

Since I was making this up as I went along, I covered the white chocolate with 3/4 of a cup of graham cracker crumbs. That was too much, I'll explain why later. I would suggest using 1/4 to 1/2 cup of crumbs. Gently press the crumbs into the white chocolate and put it in the fridge to harden.


Around this time, my coconut was done and I pulled it out of the oven to cool.


Once the white chocolate is hardened, melt the dark chocolate.


Again, I microwaved it at 20-30 second intervals, stirring it each time I checked. When it was fully melted and smooth, I spread it over the white chocolate/graham cracker crumb layer.

I then sprinkled the 1/2 cup of toasted coconut and 1/2 cup finely chopped walnuts.


Make sure to press the coconut and walnuts gently into the chocolate so they adhere.


Pop the sheet pan back into the fridge and wait for the chocolate to harden.

Now comes the fun part. When everything is hard, break the candy into various sized pieces.


Here is where I explain why 3/4 cup of graham crackers was too much. The dark chocolate couldn't stick to the white chocolate because the graham cracker layer was too thick, so when I broke it apart, several pieces separated between the layers.

That being said, it was still delicious! Take a small piece and pop it in your mouth and it has all the flavors of a Hello Dolly bar cookie!

Monday, August 1, 2011

Decadent Peanut Butter Cup Brownies


Today's my birthday. I won't tell you how old I am, that will just depress me. Instead, I'll pretend I'm still 25 and we'll all be happier.

Last week was my vacation, I took a week off from work to spend time with my brother and his family who were visiting from Illinois. We celebrated my birthday on Friday. Since it was my birthday, my father and my niece picked out a great cake from an Amish bakery. I was just happy I wasn't expected to bake my own birthday cake.

Knowing my love of Trader Joe's, my sister-in-law brought me a bag full of baking supplies from TJ's. They also got me the Star Wars Cupcake Stencils from Williams Sonoma, but that's for another post.

One of the items they brought were the wonderful Trader Joe's mini Peanut Butter Cups that I used in a previous post Trader Joe's and Peanut Butter Cup Brownies.


Unfortunately, chocolate peanut butter cups can't handle car rides half way across the country in July heat.


But we weren't going to give up on them. We tossed around ideas like chopping them up and using it as an ice cream topping. But, being me, I wanted to find a use for them in baking.

A couple weeks ago, I came up with Gooey Rolo Brownies and they ended up being very delicious and quite popular. So I decided to tweak the recipe a bit and create these Decadent Peanut Butter Cup brownies.

I used the same base brownie recipe from Hersheykitchen.com: Sensational Peppermint Pattie Brownies.

Instead of the Peppermint Patties, I used regular sized Reese's Peanut Butter Cups to layer in the middle of the brownies.


I wanted to use the regular PB cups because they're thinner and wider than the minis and I wanted to use them to cover more ground. It took 24 PB cups to create the middle layer.


I spread the rest of the batter on top of the peanut butter cups and baked the brownies for about 50 minutes.


While the brownies were baking, I took a fork to the melted mini peanut butter cups and broke them up into chunks.


I took the brownies out of the oven and sprinkled the mini PB cups all over the top and put them back into the oven for about 4 minutes.


The candy was melty and soft when I took them out.


I used an offset spatula to spread the melted PB cups all over the top.


These brownies were moist and had just the right amount of peanut butter to chocolate ratio.


I discovered that both the Gooey Rolo Brownies and the Decadent Peanut Butter Cup Brownies are even better the next day.

Sunday, July 3, 2011

Gooey Rolo Brownies


I seem to be on a bit of a chocolate caramel kick at the moment. While working on the Chocolate Caramel Cookie Cups, I came up with the idea to do Rolo brownies.

Years ago, I made brownies with peppermint patties in the middle. I knew that was the recipe I wanted to tweak, so I did a little online searching and found Hershey's Sensational Peppermint Pattie Brownies. The brownies in this recipe are rich and dense, perfect for supporting the candy in the middle.

I gathered the ingredients, the only changes I made were replacing the peppermint patties with Rolos and using some homemade caramel sauce as a drizzle on top.


The brownies whipped up quickly. I poured half the batter into the 9x13x2 inch pan and then layered the Rolos. I lined them up, alternating right side up and upside down to get as many in as I could. I used two 12oz bags of Rolos with about 8 leftover.


I didn't go all the way to the edges with the candy because I wanted the brownies to fill in around the edges and keep the candy on the inside only.


I poured the rest of the batter on top and carefully spread it, trying to not move the Rolos around too much.


I baked them for 50 minutes. The recipe calls for 50-55 minutes, I always bake brownies a little less so they're soft and a bit fudgy.


There was homemade caramel left over from my last baking experiment and I heated it up until it was the right consistency. Then, using a fork, I drizzled the caramel over the brownies.


I thought that I was done, when I saw the last few Rolos left over. I came up with the idea of taking each candy and cutting it in 6 pieces.


While the brownies were still hot, I sprinkled the pieces of Rolo all over the top.


Because the brownies were hot, the candy melted a bit more into little rivers of caramel oozing out of the chocolate.


These amazing brownies came out as gooey, chocolatey, caramely bites of awesomeness!

I am now trying to come up with more recipes using Rolos. They melted beautifully and the possibilities are endless.