Groucho Marx

"Outside of a dog, a book is man's best friend. Inside of a dog, it's too dark to read."
~Groucho Marx~


Saturday, April 23, 2011

Farewells and Butterbeer Cake


Every so often, you're blessed with a coworker like Bryan Peach. Someone with the wit and intellect to make the work day more delightful. Someone who is not only good at his job, but who also knows more literary and pop culture references than the best hipster blogger. Someone who will continually slaughter you in Words With Friends.

Then comes the inevitable. He hands in his two weeks notice and leaves.

Jerk.

For his last day, I knew I had to do a special cake. After conferring with his girlfriend, we decided our best choice would be a Butterbeer cake. We're all Harry Potter fans and had to try it.

I found a recipe for Butterbeer Cupcakes on the wonderful blog amyBITES.

As soon as I saw her recipe, I was looking for an excuse to make them. But if it was for his going away party, I wanted to make it in cake form.

As usual, I bought more ingredients than the recipe called for.


Following Amy's recipe I doubled the recipe and made a half sheet cake.


It came out of the oven beautifully golden brown.


But when I turned it out on the rack to cool, it was only about an inch thick. So I decided to make a second cake (I was totally making this up as I went along).

While the cakes cooled, I made the butterscotch ganache.


Couldn't have been easier. Once again, I doubled the recipe.


I didn't have a double broiler, so I made due with a larger pot on top of a slightly smaller pot full of simmering water. Hey, it did the job.


I used Amy's idea of putting the ganache in a plastic squirt bottle - made it so much easier to handle.

While the ganache and cakes cooled, I whipped up the delicious butterscotch buttercream icing.

Then it came time to assemble the cake.

Amy used the squirt bottle to inject the ganache into each cupcake. So, how could I make that work in a cake? I ended up cutting each cake in half, lengthwise, and spread a small amount of ganache on the first layer.


I put the next layer on and spread icing in top, followed by the third layer and another coating of ganache, and, finally, the last layer of cake. I then slathered on the icing.


Yes, it says "So Long Girl Jeans". Don't ask.

I used the extra ganache to drizzle on the cake and down the sides. It was too good not to use.


The cake ended up being pretty huge. I didn't mean for it to end up that big, but I couldn't stop! It was dense and delicious! The ganache soaked into the cake and made it so moist.


Thank you, Amy from amyBites for creating this awesome recipe and letting me share it.

And thank you, Peach, for years of fun and laughter and some amazing producing/web work. Good luck in your new job!


(It's never a good idea to try and cut a thick, homemade cake with a plastic knife)

Sunday, March 6, 2011

Can You Smell What The Rock Is Sewing?


Living in Central Pennsylvania you learn quite a bit about pro wrestling. It doesn't matter if you're a fan, but like NASCAR, living around here you can't escape it.

I don't get pro wrestling. But then there are a lot of popular things I don't "get" (pro wrestling, NASCAR, the Twilight series, CBS sitcoms). But I wasn't surprised when a friend asked me to make her a Rock apron.

No, not these rocks:


This Rock:


I didn't think I'd be able to do that. I could get creative, maybe find WWE fabric and a The Rock patch or something. And so I started looking.

Where do you go when you want to see if you can find something you're not sure exists? Why, eBay of course! And what did I find?

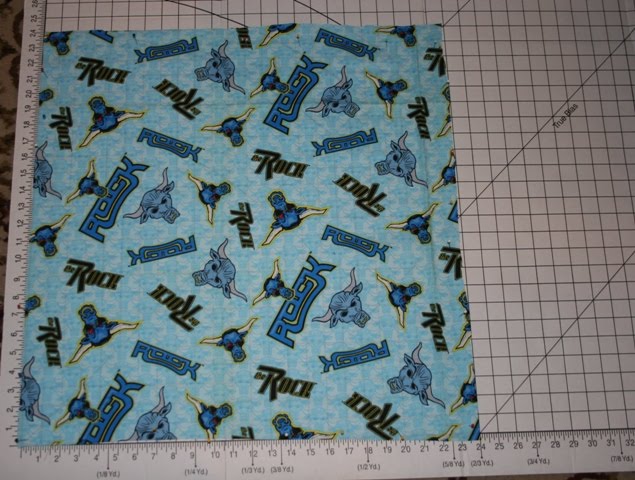
Apparently, back in 1999, there was The Rock fabric made.


I had to double check with Cynthia because I knew what The Rock looked like, but I didn't know what a bull had to do with him. And that was when I learned that The Rock has a tattoo called the Brahma Bull.


There was 1 yard of this fabric available, which was just the right amount needed for my favorite apron pattern Vanilla House Designs Four Corner Apron.


This pattern works up fast, is very versatile, fits everyone, and looks great! I've made this apron for myself and my mother. It makes the perfect gift.

I found a nice black fabric with a subtle circle design to use as the back and edging.


Starting with The Rock fabric, I cut out the front piece.


After playing around a bit, I found the perfect spot to cut out the pocket. I wanted to center one of the designs on the pocket and it took a little manuvering to do that. You'll see later, when the pocket is sewn on, how that turned out.


Using the measurements in the pattern, I cut out the front, the pocket pieces, neck straps, ties, and edging pieces.


The front worked up quickly.

Notice the pocket, I centered the picture of the bull with the word Rock on the pocket.


The most time consuming part of this project is turning the ties. You put the right sides together, sew them and then you have to turn it right side out.


There are a couple ways of doing this, you can use a large safety pin and attach to the end, using that to pull the end through. Or you can just keep working it through with your fingers. I use a large, wooden knitting needle to help me. I use the square end to push the fabric through and when it's done, I use the needle end to gently push the pointed part of the tie out.


Once the ties are done, all you need to do is attach them and the apron is done!


Overall, I'm pretty proud of how this apron turned out. I'm sure Cynthia will like it, and if not, there is no shortage of pro wrestling fans around here I can give it to.

Monday, January 10, 2011

Sheep-To-Shawl Cake Ball Pops


It's the second week of January in Central Pennsylvania, do you know what that means? It's Farm Show Week!

The Pennsylvania Farm Show is in its 95th year and is the largest indoor agricultural event in America. People travel from all over the country to take part. There are competitions, attractions, food, and every kind of agricultural animal you could imagine.

One of the most popular competitions at the Farm Show is the Sheep-to-Shawl contest. A five member team (one shearer, three spinners, and one weaver) compete by shearing a sheep, spinning the wool into yarn, and weaving a 22-by-78 inch shawl. The shawls are then judged and a winner is chosen before the shawls are auctioned off, usually bringing the teams hundreds of dollars.

Working at a local news station means I see wall-to-wall coverage of the Farm Show every year. So this year, I decided to make a Farm Show themed treat to celebrate and I decided to make cake ball pops.

I did a lot of thinking and planning, trying to decide how I wanted to decorate the cake pops. There are a lot of great little candies that would work, even mini marshmallows. But I am a fan of buttercream icing.

I went to Wilton's website for some inspiration and I found their Chocolate Chip Cake Ball Pops recipe.

I gathered the ingredients and got to work.


While the cake was baking, I made two batches of icing and colored them. I use the Wilton buttercream recipe that I learned when I took my first cake decorating class. I use this icing for all my baked goods, it is super easy to make and the best tasting.

I made the vanilla buttercream and chocolate buttercream recipes.

One of the tips I learned from the cake decorating class that I always use is that if you want to make true black icing, start with chocolate icing, it's easier to go from brown to black than white to black.

I dyed a cup of chocolate icing black for details on the sheep cake pops.


I dyed about about a cup or so of vanilla icing green and blue for the yarn colors.


After the cake cooled, I crumbled it into a large bowl and added the mini chocolate chips. To make it even more decadent, I mixed the chocolate buttercream into the crumbs.


I measured out a heaping tablespoon to make the cake balls.


For the sheep, I rolled them into slight oval shapes.


For the balls of yarn, I rolled them into circles.


The cake balls were put on cookie sheets and placed in the freezer to chill.

When they were hard enough to handle being dipped in the candy melts but still soft enough to insert the pop stick, I took the cake balls out of the freezer.

I melted the candy melts in the microwave and allowed them to cool to room temperature.


I dipped the end of the stick in the candy melt and then pushed it into the cake ball. This helped the cake ball stay attached to the stick.


I then dipped the cake ball into the candy melt.


I slowly twirled the pop, trying to keep the coating as smooth as possible until it hardened enough to set aside.


I'm not going to lie, this took a while, a lot longer than I thought it would. But this is not something you want to rush.


After the candy melt hardened, it was time to start decorating. The only thing I used, other than the buttercream, were Wilton's Rainbow Chip Crunch sprinkles.


Using the black icing and a #3 decorating tip, I outlined and filled in the sheeps' faces.


I put a pink sprinkle in each one for the nose. Then, using a #1 decorating tip and white icing, I gave each sheep eyes and a mouth.


And, finally, with white icing and a #3 tip, I piped swirls all over the sheeps' bodies. They turned out super cute and fluffy!


For the balls of yarn, I took a #3 tip and piped circles around the cake balls.


I wanted to do something special to display my Sheep-to-Shawl cake ball pops, so I got a basket, a half ball of styrofoam, tacky glue, and some yarn.


The night before I made the cake ball pops, I loosely wrapped the yarn around the styrofoam and glued it on, leaving enough space between the rows of yarn to push the pop sticks into the styrofoam.


I absolutely loved how these cake ball pops turned out!


They're almost too cute to eat!

Thursday, December 23, 2010

Trader Joe's Candy Cane Joe-Joe's Cupcakes


News does not take a holiday.

That means that if you work in the news business, you're going to be working holidays. Christmas, New Years, Easter, 4th of July, Memorial Day, Thanksgiving, etc...you're going to be working most of, if not all, these days. After many years, you might get enough seniority to get one or two of those days off, but the fact of the matter is, you're going to be working while the rest of the world is enjoying a day off.

But we all know this going into the business, it isn't all bad. When I work a holiday, I always tried to make and take something in to celebrate. Over the past couple of years or so I've been working on making up my own recipes or tweaking recipes into something new. This year, I decided, for Christmas Eve, to take Trader Joe's Candy Cane Joe-Joe's and make up a cupcake based on them.


Trader Joe's Joe-Joe's are sandwich cookies, similar to Oreos, but so much better. They come in different flavors: chocolate cookies with vanilla filling, vanilla with vanilla filling, and, during the holiday season, candy cane (chocolate cookies with vanilla filling that had crushed candy canes mixed in).

I began with my favorite chocolate cake recipe. It's a Wilton recipe called Chocolate Fudge Groom's Cake. I made a couple of small changes to the recipe, it calls for 3 oz unsweetened chocolate. I used 2 oz of unsweetened chocolate and 1 oz of Trader Joe's Peppermint Hot Chocolate mix.


The recipe calls for 1 1/2 cup of milk, I heated the milk, mixed in the 1 oz of hot chocolate mix and let it cool to room temperature.


This gave the cake a very subtle peppermint flavor, but it was still chocolaty and moist.

For the icing, I made the usual buttercream icing I always make, I learned it from my Wilton cake class. I double the recipe because I have a fear of running out of icing.
~ Cream 2 sticks of unsalted butter and 1 stick of unflavored Crisco shortening
~ Slowly add 2 lbs of powdered sugar
~ Add a small amount of milk until the icing is the consistency you want

For this icing, I crushed 24 Candy Cane Joe-Joes cookies.


This could be done in a food processor, but I like putting them in a big Ziploc back and using a marble rolling pin to crush them by hand. I like the texture that comes with the varying sizes of the cookie pieces.

After creaming the butter and Crisco, I added the crushed cookies before adding the powdered sugar.


The icing was flavorful and rich! The cupcakes, overall, are very good! A moist cake, rich icing, and I was worried that it might be overpowering, too peppermint-y, but the flavor was just right.

Because of the different sizes of cookie pieces in the icing, I didn't get fancy with the decorating, there was just no use trying to squeeze this icing through a decorator tip. I used an off-set spatula and placed a mound of icing in the middle of the cupcake. Then I smoothed the sides and the top before sticking a Joe-Joe in the top.